Game Client
Updates:
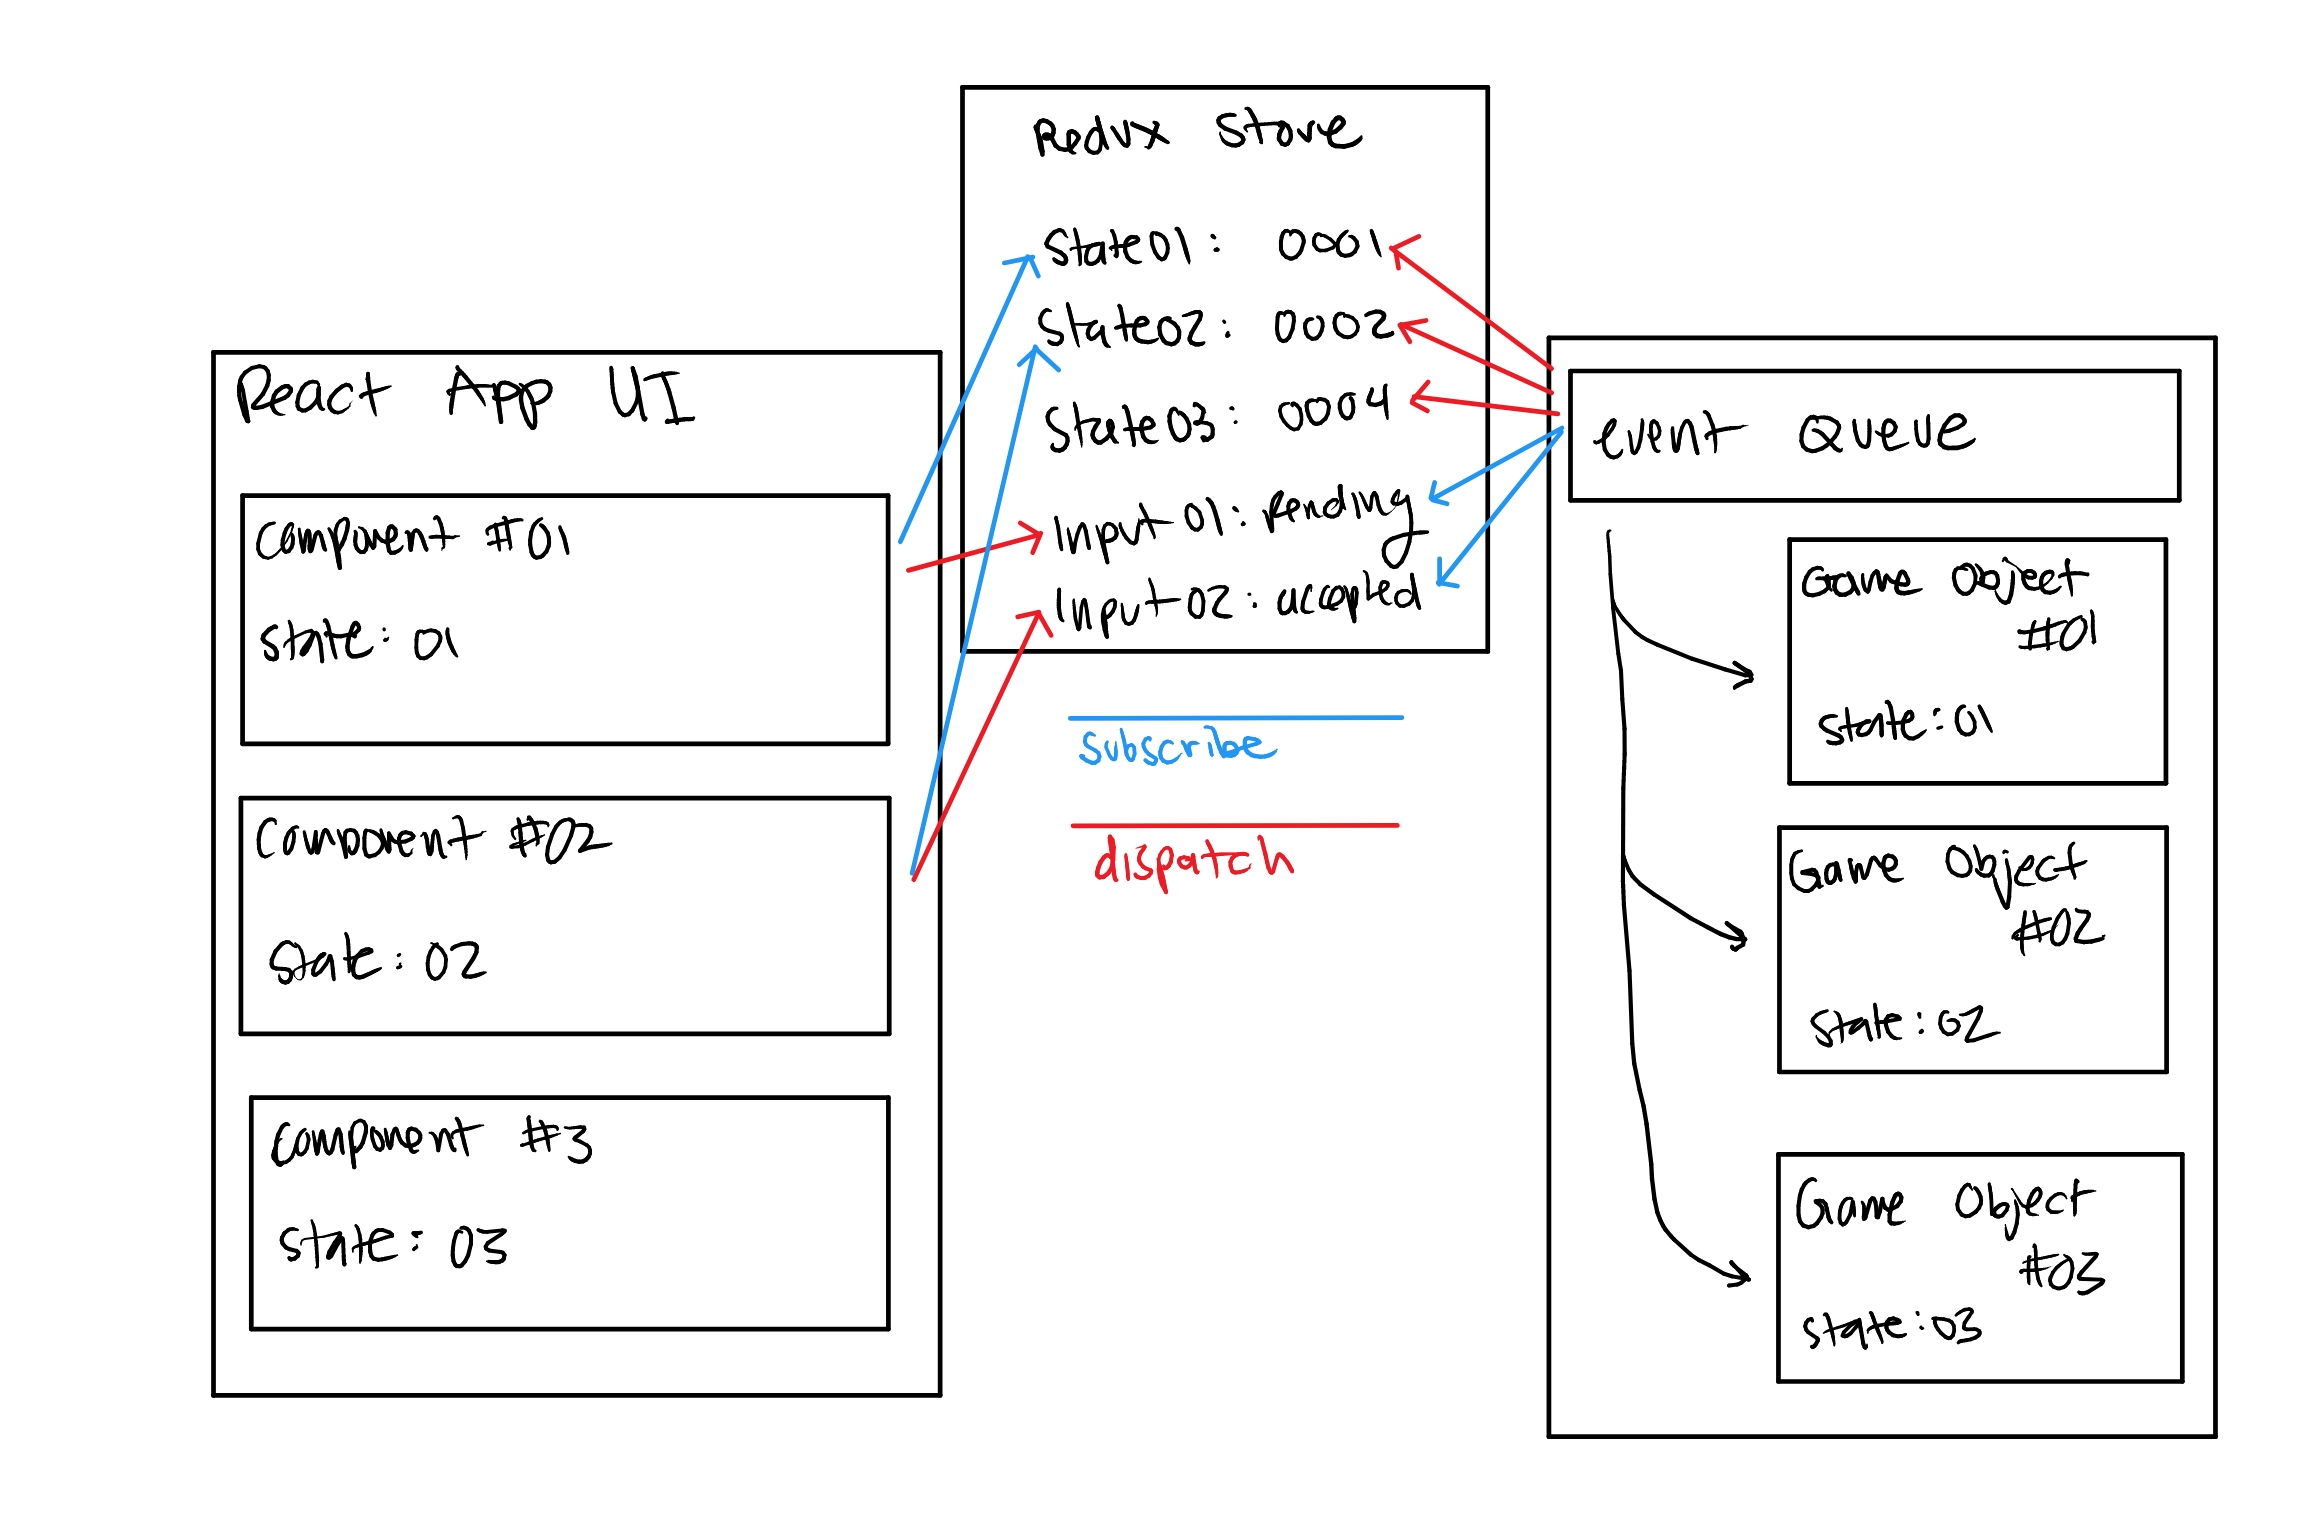
- [2020-07-28] No longer need to create an event queue for the game engine, the gameObjects themselves can subscribe to the relevant store and process updates
Description:
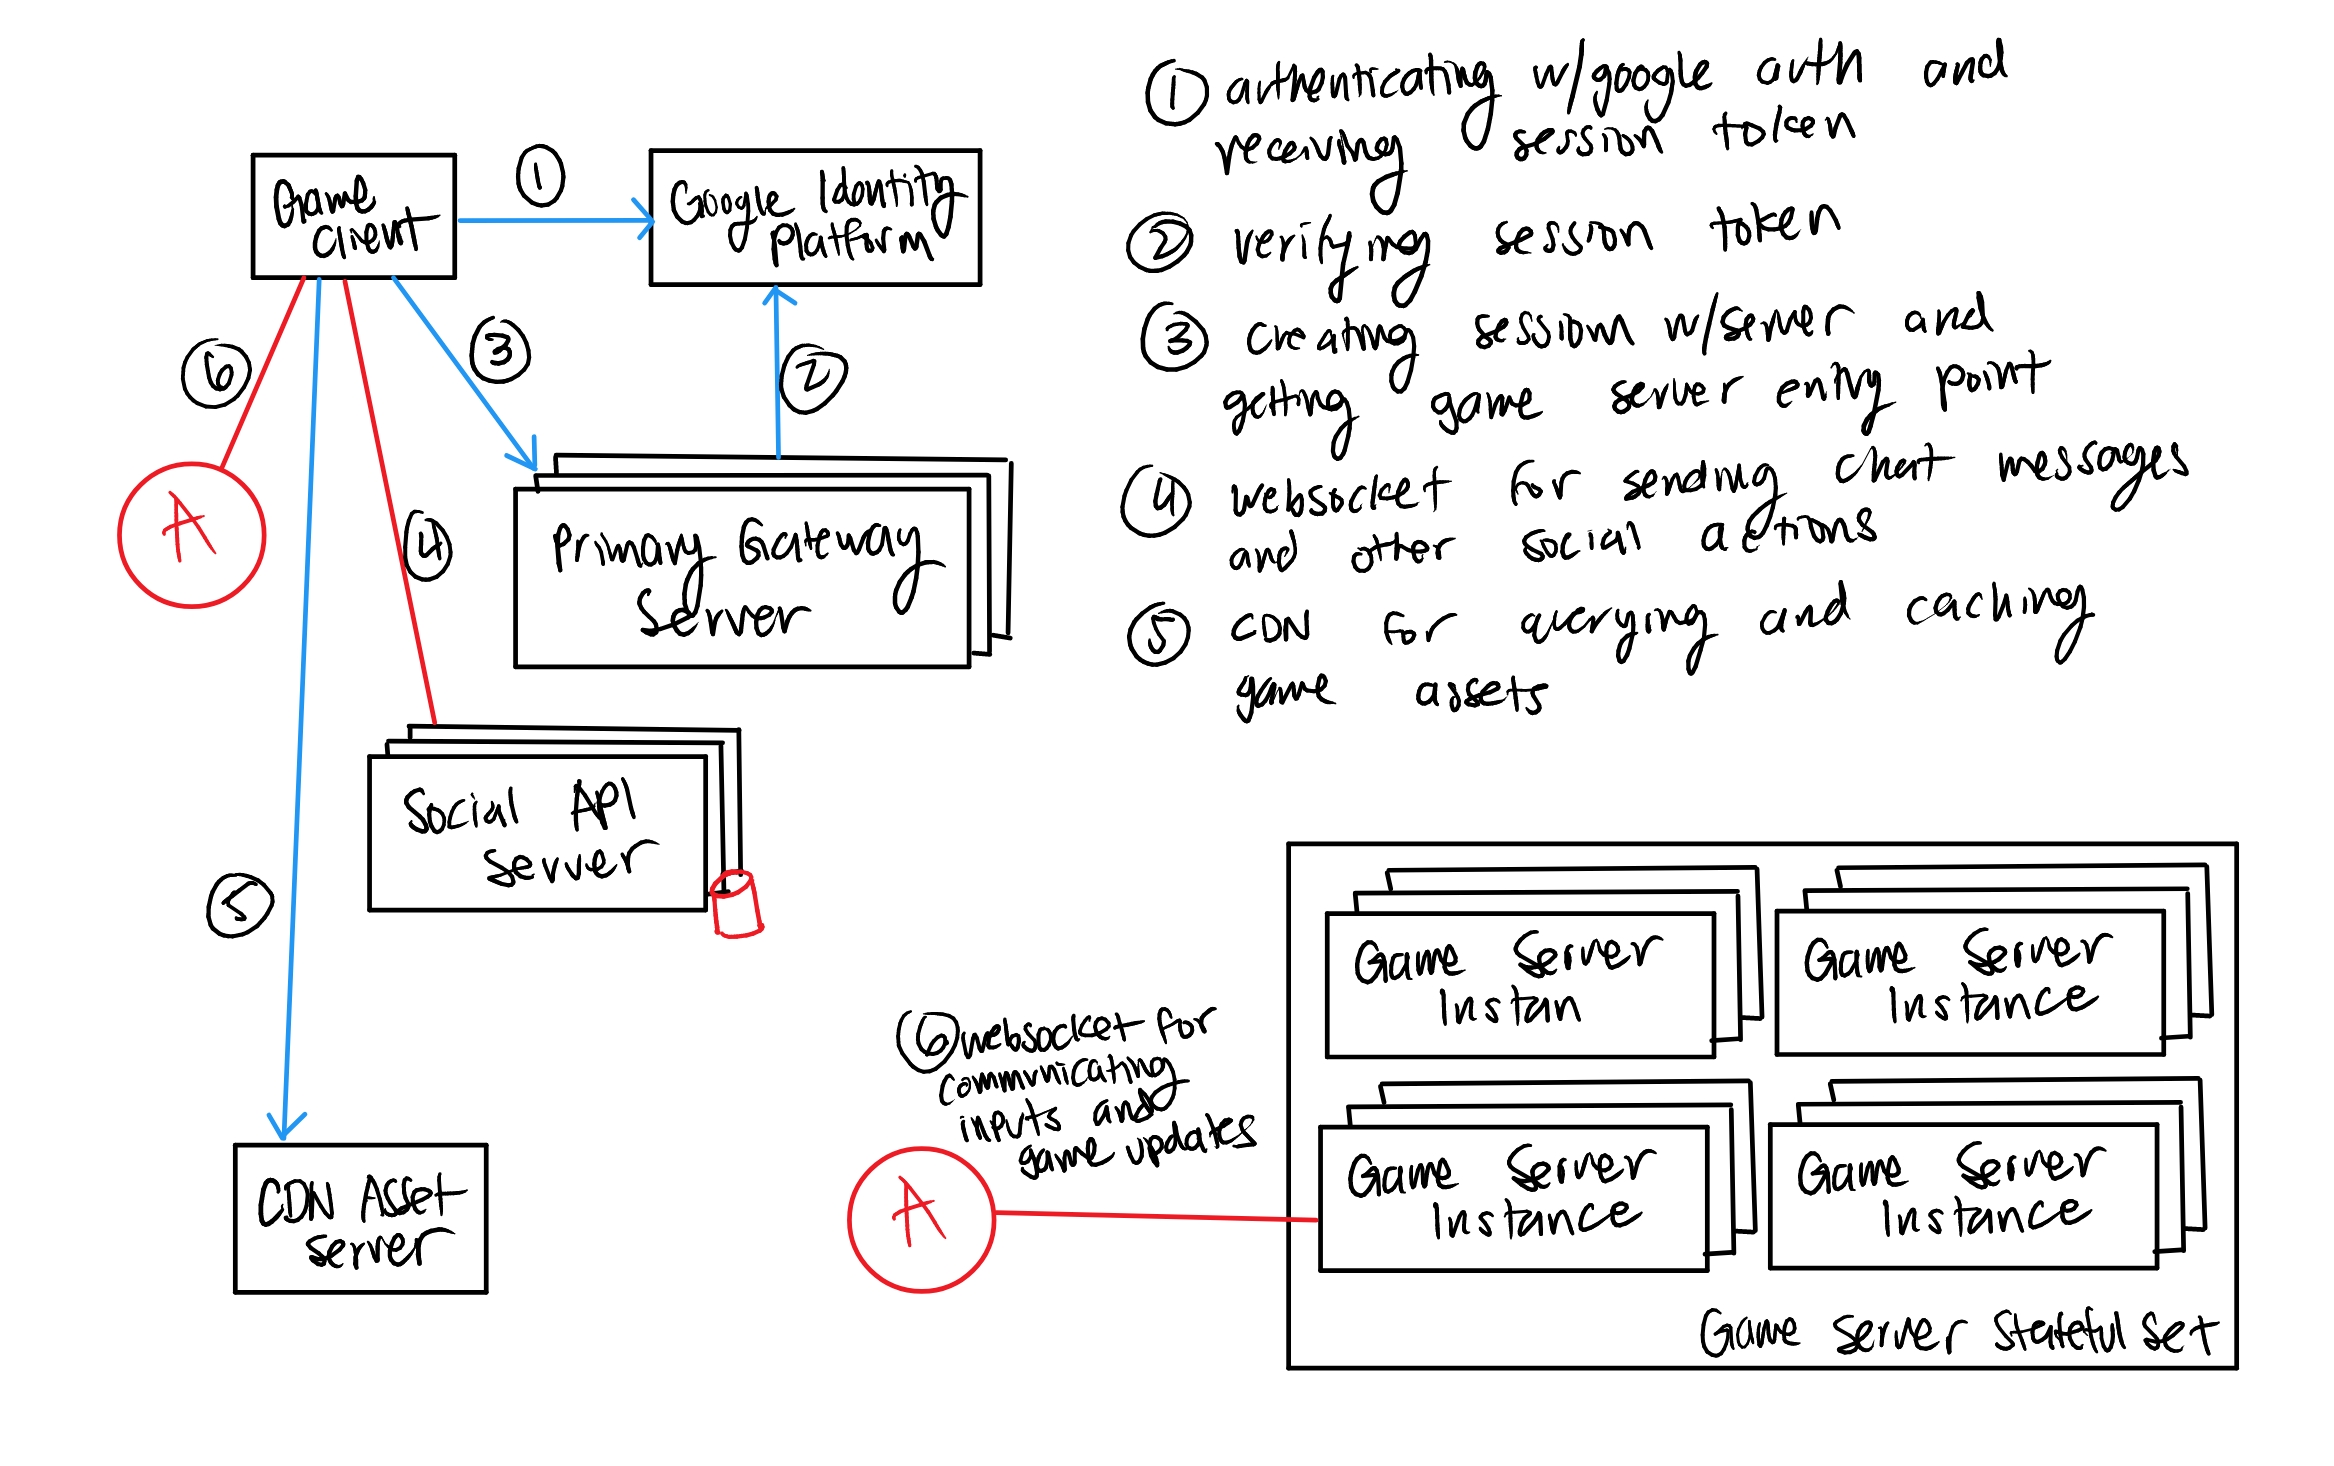
The Game Client is the client code running in the User’s browser and will be in charge of maintaining connections with the appropriate services, rendering the game and user interface onto the screen and running some game logic with client side prediction.
Features:
- authenticates client to google auth and stores session token in cache
- handles websocket connection to the social API server
- handles websocket connection to the Game Server instance
- uses React.js to render User Interface elements
- uses HTML Canvas to render Game Elements
- runs a mini5-engine instance to handle input processing and game update/draw loops.
- loads in and caches game assets
Tools:
- mini5-engine
- javascript “game engine” update/draw loop
- Socket.io
- maintaining connection with the social API server and Game Server instance
- Express.js
- used to create responsive UI elements on top of the HTML5 canvas
- Redux used as a message broker between React components and game engine
Design Considerations:
One of the tougher parts of this portion was figuring out how to handle communication between the React UI and the game engine. I decided on using a separate library (React.js in this case)just for UI elements of the game so I wouldn’t have to reimplement existing UI features with the mini5-engine (note: I’m the author of mini5-engine and it’s still a work in progress.) I wasn’t sure at first whether or not I should create the React components inside each corresponding Game Object, but I decided against that since it might require specific changes to the mini5-engine to specifically enable this to work. Since I wanted the UI to be more of an “accessory” to the Game Engine, I decided to split the applicaition into the React “App” and mini5-engine HTML5 Canvas. In order to make this implementation work however, we need to enable bidirectional communication between the two processes. There were a few things we needed to account for:
- sending information from the GameObjects to the React Component updating state accordingly
- executing a function when interacting with (clicking) a React Component that changes the game state in the game engine.
- considering where to save/store game state
A quick reminder that onclick functions must be passed into the React Component when they’re rendered. After observing how FFXIV handles their HUD, I realize that the existence of all their UI elements are predetermined. This gave me the idea to just preemptively create all the React components and just have a “display” state that makes them visible and invisible depending on if they’re in use. With the React components created, we need a way of sending new state information to the React components. Since it’d be messy to export each components “update” functions and importing them into the GameObject files as well as reusing UI elements with different GameObjects (things like dialogue), I decided against that solution. What I decided on was using Redux.js as sort of a “message broker” between the two applications. So React components can subscribe to their respective states in the Redux store and the Game Engine can dispatch updates to it accordingly. In order to send messages from the React component back to the Game Engine however, the react component would dispatch a change to an action state stored in Redux that the Game Engine would be subscribed to. The Game Engine would place that action event in an event queue and have it be ingested during the update loop.
Process Flowcharts:
Open Quest Dialogue and Accept Quest:
- User Clicks no NPC
- GameEngine detects the click on the NPC and sends DialogueText object to the ReactUI using Redux
- GameEngine changes Character State to “Reading Dialogue”
- ReactUI DialogueBox receives new state from Redux and renders the text on screen
- User can then click on the DialogueBox to render the next set of text
- After the last DialogueBox, the ReactUI opens a new QuestBox with “Accept” and “Decline” buttons
- User clicks on “Accept” button and that button sends a Redux “state” change from something like “pending” to “accepting”
- The GameEngine (which subscribes itself to the QuestBox state) reads the “Accept” state and appends it to an “Event” queue. The “Accept” state is then ingested by the appropriate Game Object during its update loop.
Viewing Inventory and Using Items:
- GameEngine updates ReactUI state to list of inventory items, and action menu/description along with each.
- GameEngine detects “I” input from user to open inventory and sends a “DisplayInventory: true” state change to the ReactUI
- ReactUI then displays the inventory along with hover effects and menu stuff
- If the User clicks on the “Use” button for an Item, the ReactUI sets a “Using” state to Redux along with a “ActiveItem: X” state change to Redux, which is subsequently read by the GameEngine object on update.


